MQTT
Publish telemetry from any endpoint to any standard MQTT broker — self-hosted or cloud. MQTT publishing is available in the Community Edition with no licence required.
How It Works
Agent endpoints (Modbus, OPC-UA, BACnet, …)
         │
         ▼
   Subscription (agent)
         │  routes endpoint data to destination
         ▼
  MQTT Destination (agent)
         │  TCP / TLS
         │  username + password auth
         ▼
  MQTT Broker (any standard broker)
         │
         ▼
  Your cloud app / time-series DB / dashboard
The agent maintains a persistent MQTT connection to the broker and publishes batched telemetry as each subscription fires. If the connection drops, outgoing messages buffer to SQLite and flush automatically on reconnect.
Setting Up an MQTT Destination
- In the agent admin UI, go to Destinations → New Destination.
- Select type MQTT.
- Fill in the connection fields:
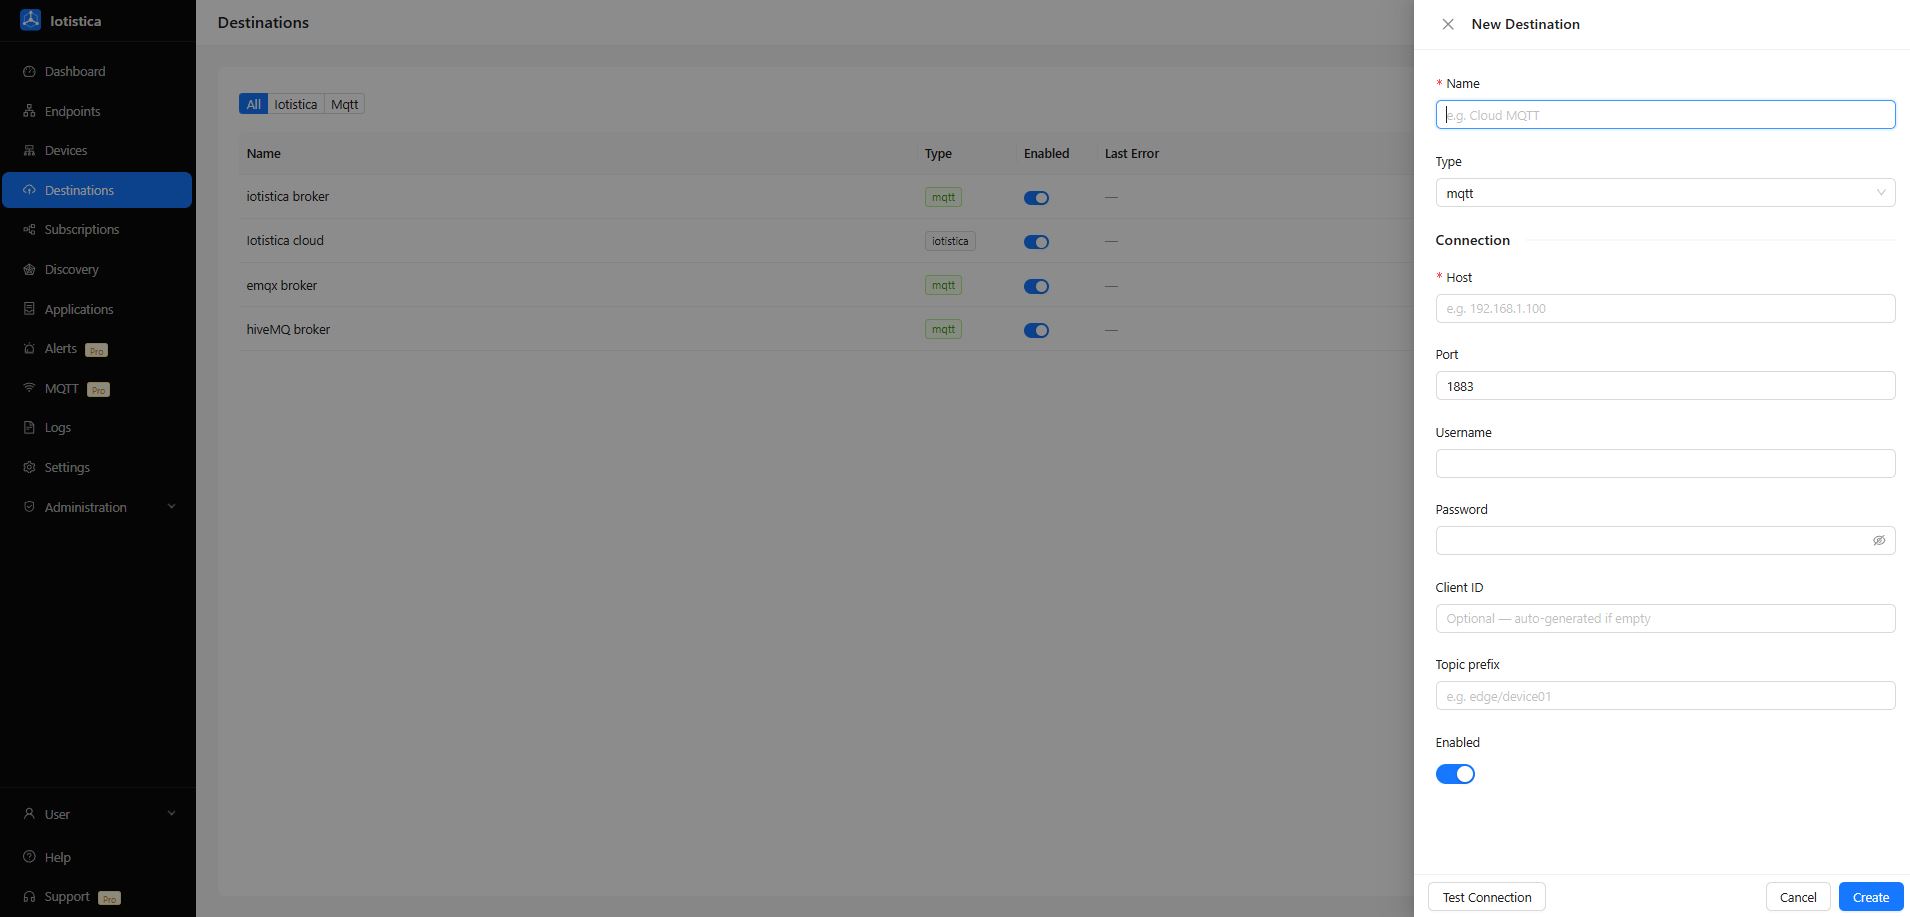
| Field | Description |
|---|---|
| Host | Broker hostname or IP address (e.g. broker.hivemq.com, 192.168.1.100) |
| Port | TCP port — 1883 for plain MQTT, 8883 for MQTT over TLS |
| Username | Broker username (leave blank if the broker allows anonymous connections) |
| Password | Broker password |
| Client ID | MQTT client identifier — leave blank to auto-generate a unique ID |
| Topic prefix | Prepended to every published topic, e.g. edge/site-a → topics publish as edge/site-a/temperature |
- Click Save, then enable the destination toggle.
Subscribing Endpoint Data
- Go to Subscriptions → New Subscription.
- Select the MQTT destination.
- Choose the endpoints and data points to route.
- Set the payload format:
| Format | Best for |
|---|---|
| Tags | Generic MQTT consumers — flat JSON with field names and Unix-ms timestamp |
| ECP | Time-series databases — typed values, omits null/BAD quality readings |
| Custom | Iotistica consumers — full envelope with quality codes and deduplication ID |
- Click Save and enable the subscription.
Cloud Provider Examples
HiveMQ Cloud
HiveMQ Cloud offers a free serverless MQTT broker with TLS and username/password auth.
- Sign up at hivemq.com and create a free cluster.
- In the HiveMQ console, go to Access Management → Credentials and create a username and password.
- Note your cluster URL — e.g.
abc123.s1.eu.hivemq.cloud. - In the agent, add an MQTT destination:
| Field | Value |
|---|---|
| Host | <your-cluster>.s1.eu.hivemq.cloud |
| Port | 8883 |
| Username | HiveMQ credential username |
| Password | HiveMQ credential password |
| Topic prefix | e.g. iotistica/<site-name> |
EMQX Cloud
EMQX Cloud is a fully managed MQTT service with a free trial tier.
- Create a deployment in the EMQX Cloud console.
- Under Authentication, add a username and password.
- Copy the Connection Address and port (
1883for standard,8883for TLS). - In the agent:
| Field | Value |
|---|---|
| Host | Your EMQX deployment address |
| Port | 8883 (recommended) |
| Username | EMQX auth username |
| Password | EMQX auth password |
| Topic prefix | e.g. plant/line-1 |
Mosquitto (Self-Hosted)
Eclipse Mosquitto is the most widely deployed open-source MQTT broker and the same broker bundled with the Iotistica agent.
- Install Mosquitto on any Linux host:
sudo apt install mosquitto mosquitto-clients
- Configure a password file:
sudo mosquitto_passwd -c /etc/mosquitto/passwd myuser
- Edit
/etc/mosquitto/mosquitto.conf:listener 1883allow_anonymous falsepassword_file /etc/mosquitto/passwd - In the agent:
| Field | Value |
|---|---|
| Host | IP address of your Mosquitto host |
| Port | 1883 (or 8883 with TLS configured) |
| Username | The username from the password file |
| Password | The password you set |
AWS IoT Core (MQTT)
AWS IoT Core supports standard MQTT with username/password via custom authorizers, or with X.509 certificates. For certificate-based auth with automatic credential rotation, use the dedicated AWS IoT Core integration (Agent Pro).
For simple username/password via a custom authorizer:
| Field | Value |
|---|---|
| Host | <account-prefix>.iot.<region>.amazonaws.com |
| Port | 443 or 8883 |
| Username | Authorizer token (format per your authorizer config) |
| Password | Token signature |
The Things Network (TTN)
The Things Network exposes received LoRaWAN device data over MQTT.
| Field | Value |
|---|---|
| Host | <region>.cloud.thethings.network |
| Port | 8883 |
| Username | <application-id>@<tenant-id> |
| Password | API key from the TTN console (Applications → API Keys) |
| Topic prefix | Leave blank — subscribe to TTN topics directly via an Endpoint |
Adafruit IO
Adafruit IO is a simple cloud dashboard with built-in MQTT support.
| Field | Value |
|---|---|
| Host | io.adafruit.com |
| Port | 1883 or 8883 |
| Username | Your Adafruit IO username |
| Password | Your Adafruit IO key (from Account → Keys) |
| Topic prefix | <username>/feeds |
Payload Example
Using the Tags format, a single subscription publish looks like:
{
  "ts": 1718000000000,
  "tags": [
    { "name": "temperature", "value": 23.4, "quality": "GOOD" },
    { "name": "pressure",    "value": 1.01, "quality": "GOOD" }
  ]
}
Published to: <topic-prefix>/<endpoint-name>
Troubleshooting
| Symptom | Likely cause |
|---|---|
| Destination shows connection error | Wrong host or port, or broker not reachable from the agent network |
Connection refused | Broker not running, or firewall blocking the port |
Authentication failed | Wrong username or password |
| Messages not appearing | Check the subscription is enabled; use mosquitto_sub or MQTT Explorer to verify the topic |
| TLS handshake error | Broker requires TLS on port 8883 — verify the broker's certificate is trusted |
Related Docs
- Destinations — creating and managing publish destinations
- Subscriptions — routing endpoint data to a destination
- Data Publishing — payload formats and compression options
- AWS IoT Core — certificate-based AWS integration (Agent Pro)
- Azure IoT Hub — SAS token Azure integration (Agent Pro)
- GCP IoT Core — JWT GCP integration (Agent Pro)