AWS IoT Core
Send telemetry from Iotistica Agent endpoints to AWS IoT Core using mutual TLS (mTLS) authentication. AWS IoT Core can then route messages to Lambda, DynamoDB, S3, Kinesis, or any other AWS service.
How It Works
Agent endpoints (Modbus, OPC-UA, …)
         │
         ▼
   Subscription (agent)
         │  routes data to destination
         ▼
  AWS Destination (agent)
         │  MQTT over TLS :8883
         │  mTLS auth (device cert + private key)
         ▼
  AWS IoT Core
         │
         ▼
  IoT Rules → Lambda / DynamoDB / S3 / Kinesis / …
Authentication is certificate-based (mTLS) — the agent presents a device certificate signed by AWS IoT's certificate authority. No passwords or API keys are involved.
Step 1 — Create a Thing in AWS IoT
- Open the AWS Console → search for IoT Core → open it.
- In the left sidebar, go to Manage → All devices → Things → Create things.
- Select Create single thing → Next.
- Enter a Thing name (e.g.
factory-floor-1). Leave other fields as default. - Click Next.
Step 2 — Generate a Certificate
On the Configure device certificate screen:
- Select Auto-generate a new certificate → Next.
- Attach a policy (create one in Step 3 first, or skip and attach later).
- Click Create thing.
- Download all four files on the confirmation screen:
| File | What to save |
|---|---|
| Device certificate | device.pem.crt |
| Private key | device.private.key |
| Public key | (not needed by agent) |
| Root CA | Download Amazon Root CA 1 from the provided link |
This is the only time you can download the private key. Save it securely now — you cannot retrieve it from AWS later.
Step 3 — Attach a Policy
The device certificate must have a policy that allows it to connect and publish.
- IoT Core → Security → Policies → Create policy.
- Name it (e.g.
iotistica-agent-policy). - Click JSON and paste:
{
  "Version": "2012-10-17",
  "Statement": [
    {
      "Effect": "Allow",
      "Action": [
        "iot:Connect",
        "iot:Publish",
        "iot:Subscribe",
        "iot:Receive"
      ],
      "Resource": "arn:aws:iot:<region>:<account-id>:*"
    }
  ]
}
Replace <region> and <account-id> with your values (visible in the top-right of the console). Restrict the resource ARN further in production.
- Click Create.
- Go back to Manage → Things → [your thing] → Certificates, select the certificate, and attach the policy you just created.
Step 4 — Find Your Endpoint
- IoT Core → Settings (left sidebar, scroll down).
- Copy the Device data endpoint — it looks like:
a1b2c3d4efgh5i.iot.us-east-1.amazonaws.com
Step 5 — Add the Destination in the Agent
- In the agent admin UI, go to Destinations → New Destination.
- Select type AWS IoT Core.
- Fill in the fields:
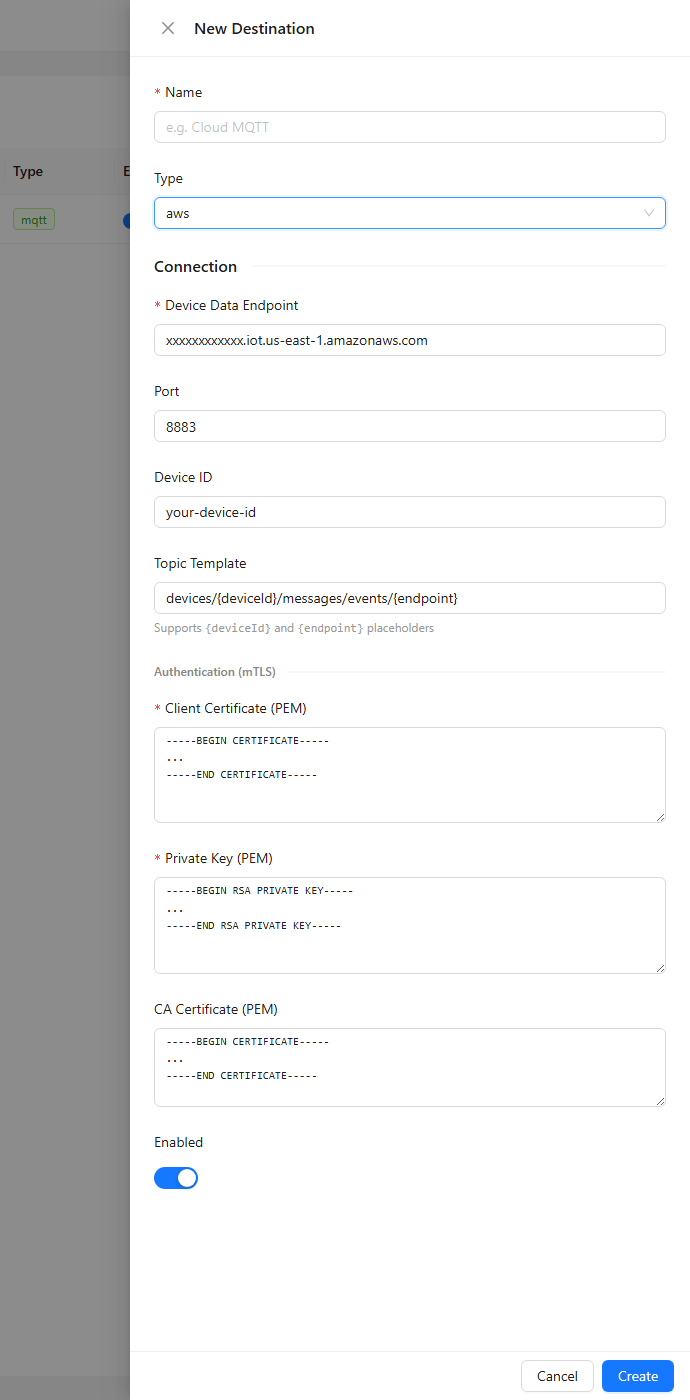
| Field | Value |
|---|---|
| Device Data Endpoint | Endpoint from Step 4 (e.g. xxxx.iot.us-east-1.amazonaws.com) |
| Port | 8883 (default) |
| Device ID | Thing name from Step 1 — used as MQTT client ID and in the topic |
| Topic Template | devices/{deviceId}/messages/events/{endpoint} (default) |
| Client Certificate (PEM) | Full contents of device.pem.crt |
| Private Key (PEM) | Full contents of device.private.key |
| CA Certificate (PEM) | Full contents of Amazon Root CA 1 (optional but recommended) |
- Click Save.
Step 6 — Subscribe Endpoint Data
- Go to Subscriptions → New Subscription.
- Select the AWS destination.
- Choose endpoint topics to route (e.g.
modbus/+/readings). - Select payload format — Tags produces flat JSON suitable for IoT Rules processing.
- Click Save and enable the subscription.
Topic Template
The default topic template is:
devices/{deviceId}/messages/events/{endpoint}
The agent substitutes these placeholders at publish time:
| Placeholder | Replaced with |
|---|---|
{deviceId} | The Device ID configured in the destination (URL-encoded) |
{endpoint} | The last segment of the source endpoint topic (URL-encoded) |
{topic} | The full source topic string |
Example — if Device ID is factory-floor-1 and the endpoint topic is modbus/line-a/readings, the publish topic becomes:
devices/factory-floor-1/messages/events/readings
You can customise this in the destination settings. AWS IoT Rules can filter and route based on any topic pattern.
Viewing Data in AWS
To verify messages are arriving:
- IoT Core → Test → MQTT test client (left sidebar).
- Subscribe to
devices/+/messages/events/+and watch for incoming messages. - Or create an IoT Rule to persist messages to DynamoDB or S3 for inspection.
IoT Rules
AWS IoT Rules let you act on incoming messages without writing any server code:
SELECT * FROM 'devices/+/messages/events/+'
Common rule actions:
| Action | Use case |
|---|---|
| DynamoDB | Store time-series readings per device |
| Lambda | Custom processing, alerting, transformation |
| S3 | Archive raw telemetry |
| Kinesis Data Streams | High-throughput fan-out |
| SNS / SQS | Notifications and queuing |
Go to IoT Core → Message routing → Rules → Create rule to set one up.
Troubleshooting
| Symptom | Likely cause |
|---|---|
| Destination stays disconnected | Certificate not attached to a policy; or wrong endpoint |
CERTIFICATE_UNKNOWN TLS error | Certificate is inactive — activate it in IoT Core → Security → Certificates |
CONNECT_ERROR with code 5 | Policy denies iot:Connect for this client ID |
| Messages not delivered to rule | Topic in rule SQL doesn't match the agent's publish topic |
| PEM parse error | Extra whitespace or missing newlines when pasting certificate/key — ensure each line is intact |
Related Docs
- Destinations — creating and managing publish destinations
- Subscriptions — routing endpoint data to a destination
- Data Publishing — payload formats and topic structure